Please sign in if you're already registered. Don't have an account with us? Sign up using the form below and get some free bonuses!
Sign in
Sign up
After a week of my sick kid having what I thought was the common cold, I finally took her to the doctor to be sure it wasn’t something serious. She’d had a sore throat and a fever along with lots of other cold symptoms. She’d been happy enough to chill out on the couch with me, so at first, I thought it was nothing to worry about. We tried some home remedies that usually help her when she's sick, but this time, she wasn’t improving at all.
As it turns out, she had RSV, a sinus infection, and parainfluenza. Studies show that, unlike many viruses that run their course in 24 hours, RSV can be contagious for as many as four weeks (1). Hello, plastic bubble. And she didn’t just have RSV, so I thought we’d be in for a long-haul recovery.
Pin for later!
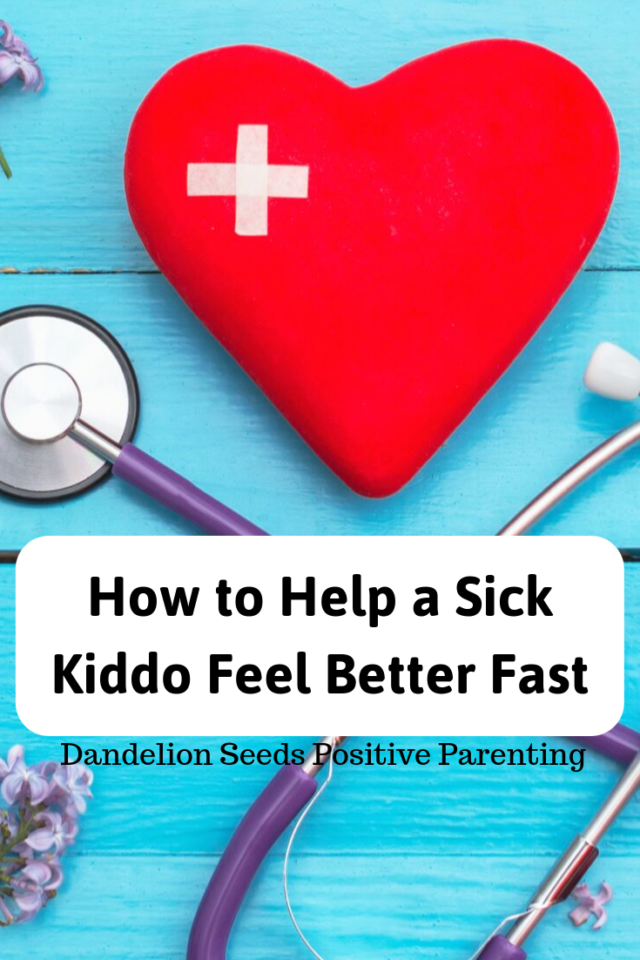
Home Remedies that Helped My Sick Kid Get Healthy---Fast
I’ll preface this by saying it isn’t medical advice. That said, it’d be pretty hard to find fault with these ideas, but do run them past your doctor to see if they’re a match for your sick kid.
Aside from the wonderful benefits of touch and snuggles on health, here are the home remedies that (ready for it?) got my child back on her feet within four days of starting them. Four days; not four weeks! Oh, and for what it’s worth, my doctor approved them for us. I’m not a fan of many of the side effects of standard meds (my child is very sensitive to them, as am I), so we prefer natural remedies whenever possible. (To be clear, we take them when we need to.)
Great for pinning!
Home Remedy #1 Almost-Too-Good-To-Be-True Anti-Inflammatory Foods (but they work, fortunately)
Some of the best health news I’ve ever heard is that dark chocolate (above 70% cocoa) is more effective for
Did you know dark chocolate can be effective against coughs?
coughs than codeine. Score! Did I need any help encouraging my sick child to have some of her favorite dark chocolate? Not one bit. We keep plenty on hand for “emergencies” of all kinds. (afflinks) And of course, I took some preventatively! To be honest, I doubt it works preventatively, but it made me happy.
Further, as easy as it is to get a sick kid to eat chocolate, it’s just as simple to convince her to have some pure, raw honey (make sure you don't give honey to a child who's less than a year old because it can lead to infant botulism). Offering her an immune-boosting garlic and honey combination was an easy sale. She ate it straight, just garlic chopped small and dipped in honey, on a spoon. She also
Honey can help soothe a cough.
ate it on toast. Along with that, she downed plenty of anti-inflammatory blueberries and fresh ginger tea.
There are lots of savory anti-inflammatory foods, too, but these sweet ones sure didn’t hurt her spirits. How nice that some of what she needed most, were things she wanted the most.
Home Remedy #2: Our Favorite Natural Medicines (with a very helpful hint)
Some of these are home remedies, and some are natural remedies that are, according to my doctor, “herbals.” I didn’t realize how easy we had it when our daughter was a baby and we could just pull out the brilliant (albeit gross) NoseFrida and give her some dissolvable cold tablets. Now that she’s older, she has stronger opinions about what she’ll ingest.
never turns down sweet elderberry syrup. You can make a homemade version of elderberry syrup for much less money if you have the right ingredients. With our doctor’s guidance, we temporarily increased her vitamin D3 (we like this version because it's an imperceptible liquid we can add to her drink).
For coughs
These help my child SO much.
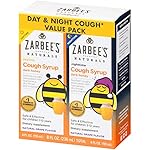
She loves her daytime and nighttime cough medicines. I love the nighttime version because it has just enough strength, along with a bit of melatonin, to help my sick kid sleep without coughing at night. The daytime version of Zarbee’s is worth keeping around, too; as is their version with individual portions (great for when we’re ready to leave the house but concerned about coughing).
For sinus problems
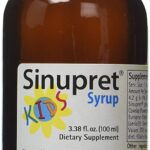
Finally, because of the sinus infection, she needed something effective, but we weren’t keen on antibiotics
The kids' and adults' versions are practically lifesavers in our house.
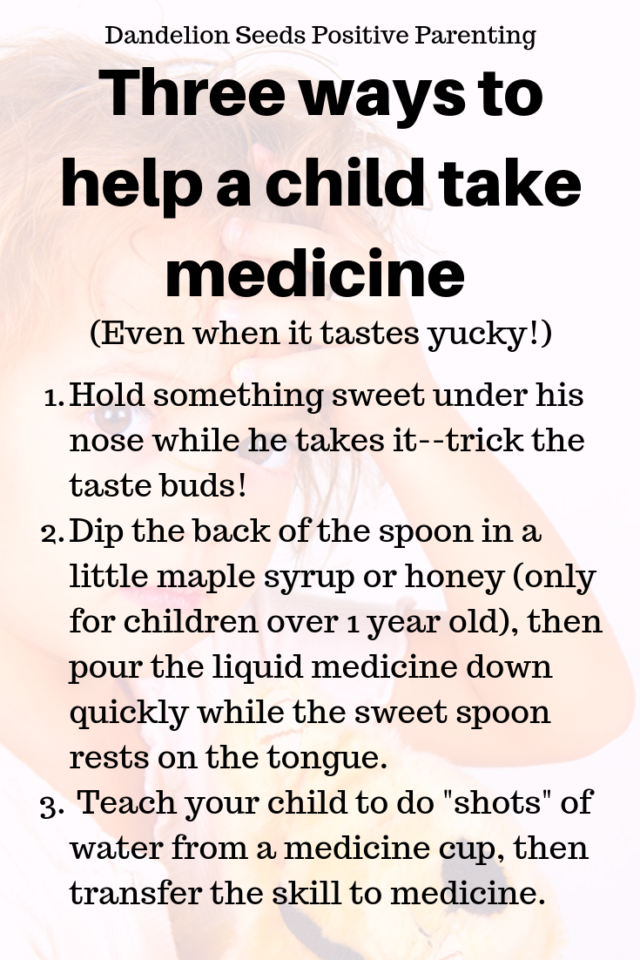
as a first defense. (Of course, we’d take them if we had to.) Although she didn’t love the flavor of this sinus medicine, oh my–her sinus symptoms disappeared almost immediately after she started it. Knowing that our sense of smell strongly affects how we taste food, she agreed to let me hold a medjool date (her favorite sweet treat) under her nose while she took the medicine. We practiced “shots” of water beforehand, and that also helped when it came time for medicine. The “tricking her senses with sweet smell” and “water shot practice” approach worked wonders, fortunately. That’s my helpful hint to you.
Our doctor also showed us a video of this “gentler” version of a sinus rinse for kids. We’re not there yet, but close.
For parents trying to stay healthy (or who didn’t manage to escape the germs)
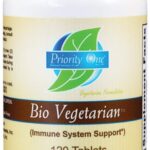
I took vitamin D3, elderberry syrup, and these AMAZING anti-viral herbs, and I managed to stay
These are the most effective option I've ever found to help keep me healthy.
completely healthy. The herbs aren’t cheap, but there are a ton of them in the bottle. They last a really long time, and in my opinion, staying healthy is worth every penny. (I did the math now, just for fun. Let’s say I took 10 of them throughout the duration of her illness. Would I pay a few bucks to avoid going down hard and feeling miserable? Absolutely.) That said, all of the kids’ items I’ve listed above are also available in adult versions on the “Food and Health” section of our site, if you need them.
Home Remedy #3: Gentle Movement
Our doctor pointed out the importance of balancing enough stillness with enough movement as a home remedy to clear my daughter’s lungs. From what I’ve heard, if we’re too sedentary, the “gunk” can get
A helpful way to open the lungs.
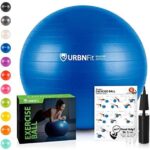
stuck in our lungs; risks include increased inflammation and potential for pneumonia. No thank you! Since my girl didn’t want to leave the couch, I grabbed my exercise ball and helped her do some gentle, lung clearing, and immune boosting stretches over it. She thought it was wildly fun (well, as “wild” as someone who doesn’t want to move can get), and she said the stretches made her chest feel better. It seemed to ease her coughing, so I’ll take her word for it.
Home Remedy #4: Humid Air
The humid air from inside the bathtub is a good way to keep a sick kid still for awhile; there’s o
We like to breathe easily at night. This helps.
nly so far she can go in there. Semi-immersion in warm water helped release the gunk in her lungs. Although she coughed more, the coughs became more productive.
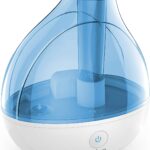
At night, we used a really effective and adjustable cool mist humidifier. I love how quiet it is, and that it has a 12- and 24-hour timer option if I forget to turn it off in the morning when my mind is on caring for the sick kid.
Home Remedy #5: A One-Way Ticket to Stay Home
No matter how bored we got, we stayed home. We certainly didn’t want to inflict the Plague of Blaaaah (as I dubbed it) on anyone else. I picked up enough library books to run the entire length of our house, and we read every single one. There’s just no substitute for staying still and letting a sick child’s body heal.
Now, How To Entertain a Sick Kid for (Potentially) Weeks on End?
The home remedy part is easy compared to figuring out what to do at home for weeks. And fortunately, we didn’t have to figure it out. She got better. Quickly.
As a mama, the home remedies that get us up and out as fast as possible, are exactly the ones I like best. As they say, prevention is the best medicine. It feels so good to be well.
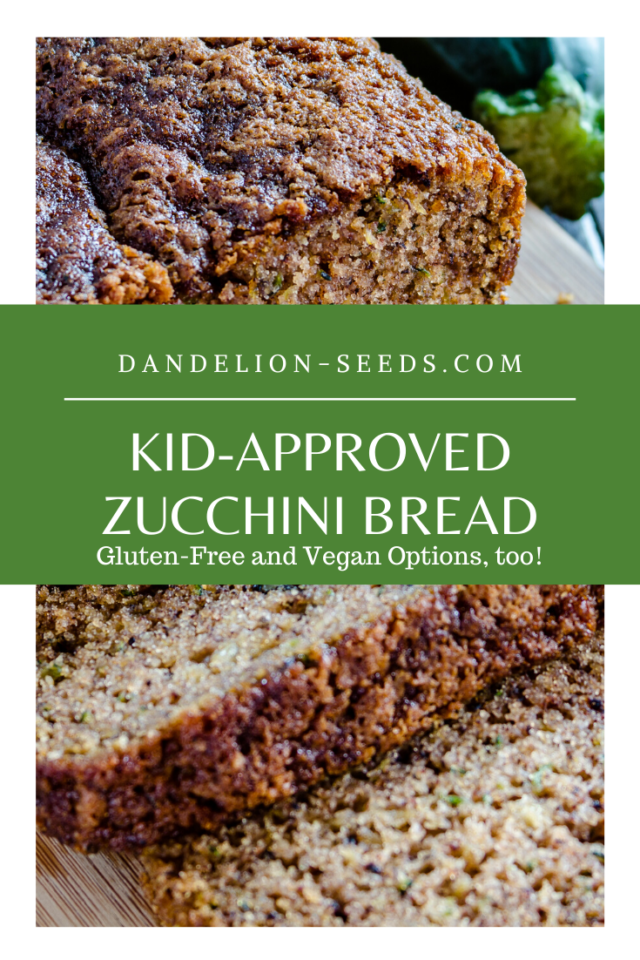
If you've read about my pumpkin spice muffins, you'll know I'm all about gluten-free and healthy recipes that taste like their non-healthy versions. I won't skimp on flavor just to get in some health points; I want to enjoy what I'm eating. So, I decided to expand my healthy muffin recipes and create gluten-free zucchini bread, too---full of magical nutrition, of course. Bust mostly, I want flavor. I want YUM. This gluten-free zucchini bread (or muffins if you prefer) are no exception to my rule. They're nearly a perfect breakfast food for us and we love them.
Zucchini Nutrition
Zucchini offers incredible health benefits such as vitamins B6, C, and K; folate, fiber, and lots of other vitamins and minerals. Still, I confess I never considered gluten-free zucchini muffins a viable breakfast option. I wrongly assumed I wouldn't want a vegetable all mixed up in my morning; I saved them for my dinner plate. (I love being wrong sometimes!)
Pin for later!
Healthy Flours for Healthy Breads and Muffins
I had to experiment a bit with gluten-free flours because I was tested as having "borderline" celiac disease, and I know I'm sensitive to gluten. I want to give my body every fighting chance it has to be as healthy as possible. As a result, I follow a gluten-free diet and take special care to find healthy recipes items that are specifically labeled gluten-free. People with celiac disease should absolutely and always use gluten-free flours, such as garbanzo/chickpea flour, almond flour, coconut flour, and many of the other alternatives out there (afflinks). And that said, presuming you don't have celiac disease, you could certainly use standard wheat flour in this recipe if that's your preference.
What This Recipe Doesn't Have
It's free of refined or white sugars
There's no vanilla extract (not a health issue, but better for the planet to avoid it)
Ingredients for Gluten Free Zucchini Bread or Muffins
Prep time is about 10 minutes.
2 eggs (OR flax or chia "eggs"---both work for a vegan option or for allergy purposes!)
1/2 cup blackstrap molasses. (Maple syrup would work if you like your gluten-free zucchini bread or muffins sweeter, as would honey---although honey loses its health benefits when baked. If you use molasses, the muffins or loaves of zucchini bread will turn out darker. That's perfectly fine.)
1/3 cup extra virgin olive oil
1/2 cup milk or dairy-free alternative (We use hemp milk, almond milk, or oat milk.)
1/4 teaspoon ground nutmeg
1/4 teaspoon salt
1 teaspoon baking soda
2 cups gluten free flour (I use this brand when I make these at home, although the
This recipe for gluten-free zucchini bread also works great for muffins!
garbanzo flour I mentioned above would work well, as would a garbanzo/fava mixture.)
1 very large zucchini chopped in a food processor. When you're shopping, note that zucchini is different from summer squash.
Optional: Substitute pumpkin spice for cinnamon and nutmeg. Just use the same quantity as the recipe calls for. if you don't want to add the nutmeg and cinnamon separately or want a slightly different flavor in your loaves, you can substitute pumpkin pie spice. Just use the same quantity as the recipe calls for, for the others.
Gluten-Free Zucchini Bread, Optional Add-Ins to Make This Healthy Recipe Even Healthier:
Walnuts or other mix-ins (even dark chocolate chips, blueberries, raisins, or coconut flakes!)
If I'm using chia, flax, or hemp seeds, I use no more than about a teaspoon. See how you tolerate them. If you're using flax or chia "eggs" instead of chicken eggs, I wouldn't recommend adding more as a mix-in. However, adding a mix-in with vitamin C is good idea for a healthy recipe. Adding the vitamin C from the blueberries to the loaves would help you absorb the iron that's in them, especially if you follow a plant-based diet!
Baking Instructions
Preheat oven to 350 degrees F.
Whisk together the wet ingredients---eggs, molasses, olive oil, and milk---in one mixing bowl.
In a second bowl, thoroughly mix together the nutmeg, salt, baking soda, and gluten-free flour (or wheat-based flour if you prefer).
Use a spoon to mix your chopped zucchini into your wet ingredients.
Combine the contents of both bowls and mix them together. It'll be lumpy. That's good. If you're adding mix-ins, add them now.
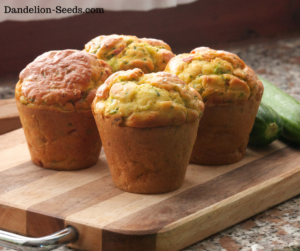
Spoon your batter into baking cups of your muffin pan or directly into your loaf pan. Although I use a nonstick silicone muffin pan, which is great for preventing messes, I still used baking cups for this recipe. These won't rise much while baking so you can fill them pretty full.
Bake for approximately 30 minutes for muffins or 60 minutes for bread. Test for doneness with a toothpick. Both the muffins and gluten-free zucchini bread firm up a little while cooling. You can cool the bread in the loaf pan and the muffins on a wire rack.
Yield: One loaf of gluten-free zucchini bread or 12-16 healthy muffins
Once they're cool, some people like to add a vegan or greek yogurt to the top for some extra health benefits for their gluten-free zucchini bread. My daughter calls it "frosting," so it's a win.
I haven't experimented with mini-muffins since I use a regular-sized muffin tin; the one I use bakes 12 muffins at a time. I needed two muffin tins since I had enough batter for about four extra gluten-free zucchini muffins beyond the 12 my first pan would allow.
It works as a bread or as muffins. A healthy recipe like this can come in all shapes and sizes---we've even baked loaves in a heart-shaped baking dish!
Sometimes even the healthiest of eaters miss the things they used to eat before they cleaned up their diets. That's true for us, anyway.
Both my husband and daughter react negatively to good old fashioned potatoes. You heard that right. No mashed potatoes at Thanksgiving; no French fries or potato chips.
So, we've cleaned up their diets and have committed to (usually) healthy alternatives. And I'm along for the ride, potato-wise.
For us, one part of healthy eating has been finding ways to replace what we used to enjoy.
Fortunately, not only are Japanese yams healthier than standard potatoes*, but they also taste better, in our opinion.
They're white on the inside, and easy to mash and put on the table next to the turkey (or tofurkey). Next to regular potatoes, I'm not sure I'd be able to tell them apart by looks alone. Kind of like Gwenyth Paltrow and me. (Kidding. Sigh.)
As an added bonus, this healthy alternative to potatoes has just a single ingredient. If you've seen my homemade almond butter, you'll know I like to use as few ingredients as possible.
They're one of the easiest crowd pleasers I know how to make. Everyone who's tried these at our house, loves them. And once again, I'm almost embarrassed to share the recipe because it's so simple. Consider it a gift from me to you!
Japanese Yam Chips
Preheat your oven to 350 degrees F
Wash a Japanese yam
Peel it if you want to, or keep the skin on for extra nutrition
Cut the potato into 1/8 - 1/4" slices
Arrange the slices on a baking mat like this one (afflink) or on parchment paper
Bake for 30 minutes or until slightly browned (they'll be more brown on the bottom, so check as often as you need to)
Note: We also like using red garnet yams and prepare them the same way. Another delicious and healthy alternative!
My husband and I like them baked like a regular baked potato, as well, but the little fiber strings they sometimes have deter our texture-sensitive daughter. She jumps for joy at the chips, though, so it's a win for the whole family!
We appreciate your support! Click here to see all the children's books, parenting books, toys and games, travel necessities, holiday fun, and wellness-related items that we've used and loved. As an Amazon Associate, I earn from qualifying purchases. However, pricing (including sale prices) and shipping are still from Amazon. Once you click the checkout button from your Dandelion Seeds cart, it’ll direct you to Amazon to complete your purchase.
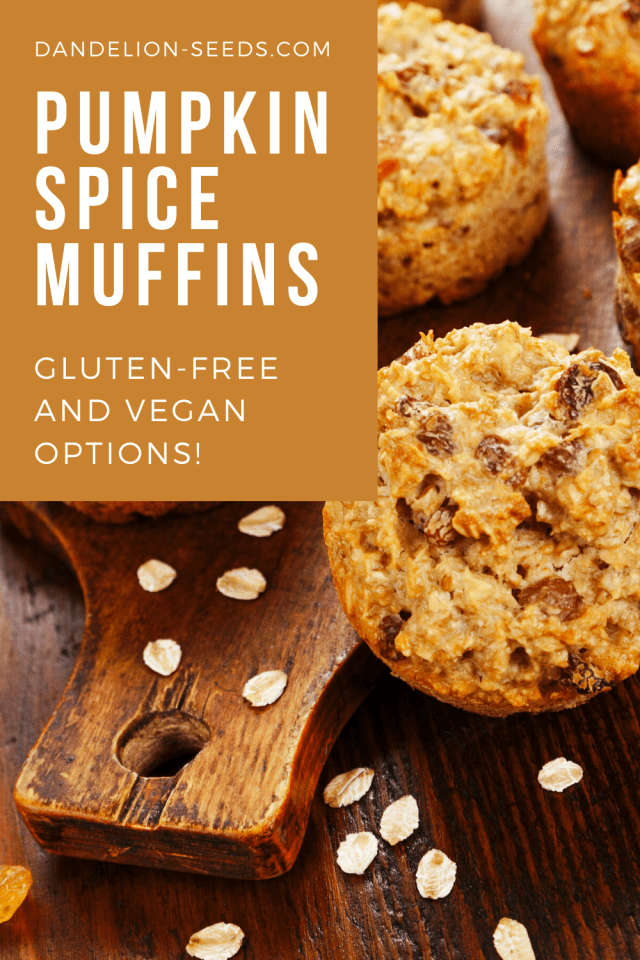
Gluten free pumpkin spice muffins are amazing. In fact, I'm going to go out on a limb and suggest we rename autumn "Pumpkin-Fall." And if you're anything like me and want delicious pumpkin-flavored treats year-round, we can also rename Winter, "Snowy Pumpkins" and Spring, "Blooming Pumpkins." What about Summer, you ask? I want to hear what you think we should call it. "Hot and Sweaty Pumpkins" doesn't sound quite right.
That aside, I've been craving warm breakfast foods lately. Plus, I want to boost my immune system this time of year--especially since I spend most of my week traveling to various schools with their wide variety of kiddos and alllll they bring into it. Perhaps most importantly, I want a breakfast that tastes good while still starting my day off right health-wise.
I made a checklist of what I want in the morning. Here's what I was looking for:
Protein
Whole grain
Lots of good vitamins and minerals
Nothing artificial
Allergy-friendly
Fiber
Easy to make
Refrigerator-friendly
Freezer-friendly
Portable
Gluten-free (necessary for me; optional for you)
And of course, YUMMY!
I found everything I was looking for in these pumpkin spice muffins!
Pin for later!
Gluten Free Pumpkin Spice Muffins for Breakfast (or Anytime)!
Preheat your oven to 350 degrees F. Use two bowls: one for your wet ingredients and the other for your dry ingredients. One bowl should be large enough to hold all the ingredients when you combine them. I like this one (afflinks) since I can put a lid on it if I need to take a baking break.
Bowl #1
Dry Ingredients. Combine the following:
1 teaspoon pumpkin pie spice
1/4 teaspoon salt
2 cups quick oats (gluten-free if necessary--I like these and buy them in bulk). Note that these gluten free pumpkin muffins would work just fine with wheat and several other types of flour if you're not sensitive to gluten like we are.
2 teaspoons baking powder
1/2 teaspoon baking soda
Bowl #2
Wet ingredients. Combine the following:
1 cup pumpkin purée *OR* 2 medium-sized bananas, smashed with a fork until smooth (no need for the bananas to be overripe like in many recipes; this will be sweet either way)
1/3 cup blackstrap molasses; this is another item I buy in bulk since I use it in so many recipes and it stores well for a long time
1/2 cup unsweetened non-dairy (or dairy) milk; I love using this hemp milk in it. If you use non-dairy milk, choose one that tastes good when baked.
1/2 teaspoon vanilla extract
Combine the contents of the two bowls. Mix just until combined. Get your muffin pan, and then for the easiest cleanup, use a large spoon to fill baking cups fairly full. These muffins won't rise much. Bake for 30 minutes or until a toothpick comes out clean.
And then eat until your heart's content, no matter the pumpkin season! These gluten free pumpkin spice muffins stay good in the fridge for a couple days or a couple of months in the freezer.
Do these gluten free pumpkin spice muffins make your mouth water, or what?
If you like them and/or are looking for something similar to try (at least as far as the health profile goes -- the flavor is quite different) -- you will undoubtedly enjoy our gluten free zucchini bread. They, too, work well as muffins and are SO good. We don't hesitate to eat them for breakfast to start our days off right!
Half the people in our city are sick this week. Half. No good, I say! We like feeling healthy and strong, thank you very much. I have no time to be down with a cold or flu. So, to the extent that I can, I'm giving my body every tool imaginable to keep it working properly and happily. My Instant Pot® stew is one such tool, and I'm thankful for it (afflinks).
Inspired by the memory of a wonderful soup friends in Québec City made for me years ago, I looked up some of the best warming ingredients I could find and decided to experiment with them. Since, unfortunately, my husband is one of the people who's down with a cold, I didn't want to invest a lot of time shopping and cooking. I wanted to create something that would give us all the benefits of germ-fighting powerhouse foods but without losing hours in the kitchen that I could be spending elsewhere (like sanitizing everything in my house from top to bottom).
I'm happy to report that my experiment worked! Now, we're the proud owners of a brand new recipe that's downright good--not only for the body, but for our spirits, too. It's an all-around feel-good meal. Who knew we could make our own comfort food?
Part of what makes this recipe so easy is that everything goes straight from being chopped to directly in the Instant Pot.
Instant Pot Carrot Ginger Red Lentil Stew, otherwise known as Easy Comfort Food Stew
6 large carrots, chopped fairly small by hand or in a food processor
1 large clove of fresh garlic, chopped by hand or in a food processor
Approximately 1.5-2 inches of fresh ginger, peeled, then grated or chopped in a food processor (time saving tip: process the carrots, garlic, and ginger together)
1 1/2 cups rinsed red lentils
2 Tbsp olive oil
2 cups vegetable or low-sodium chicken broth (alternatively, use only water and add more seasonings)
2-3 cups water depending on the consistency you like (more water for soupy-stew, less water for thicker stew)
Option #1: Up until now, this is a vegan recipe (if you've used vegetable broth or water). If that's not your thing, you can add meat (my husband likes chicken).
Option #2: Spice it up with 1 tsp (or more) turmeric powder.
Option #3: Bonus health points if you add fresh greens! I like basil, but just about any green, including carrot greens, can work great here.
Turn on the Instant Pot to your "Stew" setting and set it for 15 minutes. We used the quick release function at the end, and it turned out perfectly! Add seasonings to taste, if need be, but I like it just as it is. If it's too thick for your liking, you can always add more water.
Serves four adults.
Be well!
Let's be friends
Navigation
Amazon Associate Disclaimer
As an Amazon Associate I earn from qualifying purchases.